Project details
Skill
1 out of 5Easy
Cost
Estimated Time
We may be compensated if you purchase through links on our website. Our Reviews Team is committed to delivering honest, objective, and independent reviews on home products and services.
More
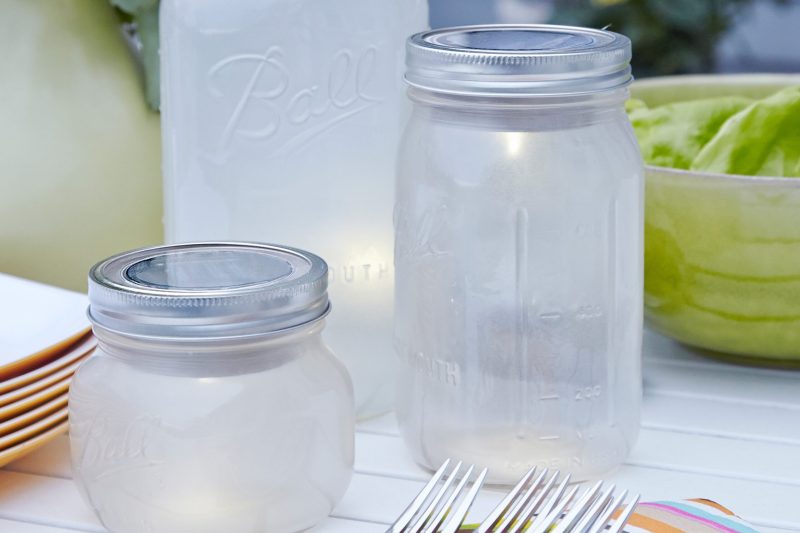
Mason jar patio lights are a charming and eco-friendly way to illuminate your outdoor spaces. This DIY project combines the rustic appeal of mason jars with the convenience of solar power, creating a warm, inviting glow for your patio or garden. In this guide, we’ll walk you through the process of creating your own solar-powered mason jar lights, from gathering materials to troubleshooting common issues.
*Unless otherwise noted, costs in this article reflect an average of prices that our team found from hardware stores like Lowes and Home Depot, and on Amazon.com.
Materials Needed for Mason Jar Lights
Before diving into the creation process, gather all the necessary materials. Having everything on hand will make the project run smoothly and efficiently.
Essential Supplies
To create your mason jar patio lights, you’ll need:
- Wide-mouth mason jars
- Solar-powered pathway lights
- Plexiglass sheet
- Frosted glass spray paint
- Glue (suitable for glass and plastic)
- Permanent marker
- Sandpaper
- Aviation snips
Optional Decorative Elements
To personalize your lights, consider adding:
- Colored glass paint
- Decorative wire for hanging
- Ribbons or twine
- Stencils for patterns
Step-By-Step Instructions for Making Mason Jar Patio Lights
Perfect for beginners, these lights are not only easy to make but also cost-effective and environmentally friendly.
Step 1: Prepare Your Mason Jars
The first step in creating your solar-powered lights is to prepare the mason jars. This process involves cleaning the jars and applying a frosted finish for a soft, diffused glow.
Cleaning and Drying
Start by thoroughly washing your mason jars with soap and warm water. Rinse them well and dry completely to ensure the frosted spray adheres properly.
Applying Frosted Glass Spray
Once the jars are clean and dry, it’s time to apply the frosted finish:
- Find a well-ventilated area, preferably outdoors.
- Place the jars upside down on a protected surface.
- Apply a light, even coating of frosted glass spray to the interior of each jar.
- Allow the jars to dry completely, which typically takes about an hour.
This frosted finish will give your lights a hazy, aged-patina look, adding to their rustic charm.
Step 2: Make the Solar-Powered Lids
The key to making these lights solar-powered lies in modifying the lids to accommodate solar cells. This step requires some precision but is still manageable for DIY beginners. Properly crafting the lids ensures that the solar cells operate effectively.
Selecting the Right Solar Lights
Choose mini pathway lights from your local home center. Look for lights with a solar cell assembly that can be easily removed from the stake.
Modifying the Lids for Solar Cells
To prepare the lids:
- Remove the metal inserts from the mason jar lids.
- Trace the shape of each insert onto the plexiglass sheet using a permanent marker.
- Cut out the plexiglass circles using aviation snips. For easier cutting, start by cutting a square around each circle, then trim the corners carefully.
- Sand the edges of the plexiglass circles until they fit snugly inside the lid rings.
This will allow the solar cells to sit properly within the lids, ensuring optimal light capture and efficiency.
Step 3: Assemble Your Mason Jar Lights
With your jars prepared and lids modified, it’s time to bring all the elements together to create your solar-powered lights. This assembly stage is where your creativity and attention to detail will pay off.
Attaching Solar Cells to Lids
To attach the solar cells:
- Remove the top portion of each stake light, which contains the solar cell and lightbulb.
- Apply glue around the perimeter of a solar cell.
- Press the solar cell onto the center of a plexiglass circle.
- Repeat for all your lights, ensuring the cells are securely attached.
Securing Lids to Jars
Once the glue is dry, insert the plexiglass circle with the attached solar cell into the lid ring. Then, screw the lid ring onto the jar.
Your mason jar patio lights are now ready to capture sunlight and illuminate your outdoor space. Place them in a spot that receives plenty of sunlight for the best results.
Creative Design Ideas for Mason Jar Lights
While the basic mason jar light is charming on its own, there are numerous ways to customize your creation to match your personal style or outdoor decor.
Color Variations and Patterns
Consider these creative options:
- Use colored glass paint to tint the jars in various hues.
- Apply stencils before spraying to create patterns on the glass, making each jar unique.
- Mix and match different sizes of mason jars for visual interest.
Hanging vs. Tabletop Arrangements
Decide how you want to display your lights:
- For hanging lights: Wrap the decorative wire around the jar’s neck and create a handle. This enables easy suspension from hooks or tree branches.
- For tabletop arrangements: Place the jars on flat surfaces or nestle them in planters. You can use them as centerpieces or accent lights.
Placement and Care Tips for Your Mason Jar Patio Lights
Proper placement and maintenance of your mason jar lights will ensure they function optimally and last for many seasons.
Optimal Locations for Solar Charging
To maximize solar charging:
- Place your lights in areas that receive direct sunlight during the day. The more sun they get, the longer they’ll shine at night.
- Avoid shaded spots or areas under dense foliage, as these will hinder charging.
- Rotate the jars occasionally to ensure even sun exposure if they’re in partially shaded areas. This ensures balanced charging.
Maintenance and Cleaning
To keep your lights in top condition:
- Wipe the solar panels regularly with a soft, damp cloth. Dust and dirt blocks sunlight and reduces efficiency.
- Check the seal between the lid and jar periodically to prevent moisture infiltration. A good seal keeps the internal parts dry and functional.
- Store the lights indoors during harsh weather conditions or winter months. This protects them from damage and extends their life span.
Our Conclusion
Creating mason jar patio lights is a rewarding DIY project that combines creativity, sustainability, and practicality. These charming lights add a warm, inviting glow to your outdoor spaces and serve as a conversation starter and a testament to your crafting skills.
Tools
-
Aviation snips